Giới thiệu Spring Boot Rest API
Đăng lúc: 09:57 AM - 07/04/2025 bởi Charles Chung - 1594REST API (Representational State Transfer) là một trong những kiến trúc phổ biến nhất để xây dựng các dịch vụ web, giúp các ứng dụng giao tiếp với nhau thông qua HTTP. Trong bài viết này, chúng ta sẽ cùng khám phá cách xây dựng REST API trong Spring Boot

1. Giới thiệu
Trong thời đại công nghệ hiện nay, các ứng dụng web và di động ngày càng phát triển mạnh mẽ. Để các hệ thống này có thể giao tiếp với nhau, các phương thức gọi API trở nên cực kỳ quan trọng. REST API (Representational State Transfer) là một trong những kiến trúc phổ biến nhất để xây dựng các dịch vụ web, giúp các ứng dụng giao tiếp với nhau thông qua HTTP. Trong bài viết này, chúng ta sẽ cùng khám phá cách xây dựng REST API trong Spring Boot, một trong những framework phổ biến và mạnh mẽ của Java.
2. REST API là gì?
REST API là một kiểu API sử dụng giao thức HTTP để giao tiếp giữa client và server. Nó dựa trên các phương thức HTTP tiêu chuẩn như GET, POST, PUT, DELETE để thực hiện các hành động như lấy dữ liệu, tạo mới, cập nhật và xóa dữ liệu.
- GET: Dùng để lấy dữ liệu từ server.
- POST: Dùng để gửi dữ liệu mới đến server.
- PUT: Dùng để cập nhật dữ liệu đã có trên server.
- DELETE: Dùng để xóa dữ liệu từ server.
3. Ưu điểm của REST API trong Spring Boot
- Dễ dàng tích hợp: Với Spring Boot, việc tạo một REST API trở nên cực kỳ đơn giản nhờ vào các cấu hình mặc định và hỗ trợ tích hợp với các thư viện khác như Jackson, Hibernate.
- Tính mở rộng: REST API giúp bạn dễ dàng mở rộng ứng dụng với khả năng giao tiếp giữa các hệ thống khác nhau, bao gồm cả các ứng dụng di động và các dịch vụ web.
- Hiệu suất cao: Spring Boot được tối ưu hóa để sử dụng hiệu quả tài nguyên, giúp REST API có hiệu suất cao trong môi trường sản xuất.
4. Cách xây dựng REST API trong Spring Boot
- Bước 1: Cài đặt Spring Boot: Để bắt đầu, bạn cần cài đặt Spring Boot thông qua Spring Initializr (https://start.spring.io/) hoặc qua các công cụ xây dựng như Maven hoặc Gradle.
- Tạo một dự án Spring Boot mới qua Spring Initializr.
- Chọn các phụ thuộc như "Spring Web", "Spring Boot DevTools" để hỗ trợ phát triển ứng dụng web.
- Bước 2: Tạo Controller
- Trong Spring Boot, các REST API được định nghĩa trong các lớp Controller. Mỗi phương thức trong Controller đại diện cho một endpoint của API.
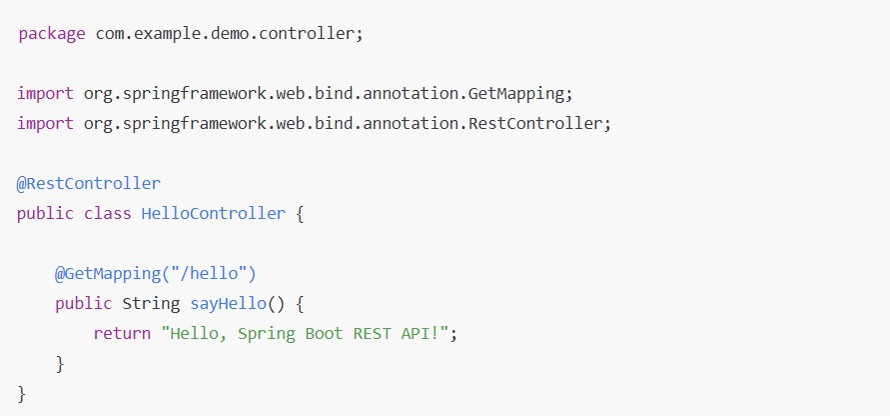
- Bước 3: Chạy ứng dụng
- Sau khi chạy ứng dụng, bạn có thể mở trình duyệt và truy cập vào http://localhost:8080/hello để nhận được phản hồi từ REST API.
5. Ví dụ: Tạo ứng dụng REST API thực hiện các thao tác CRUD với dữ liệu trên bộ nhớ.
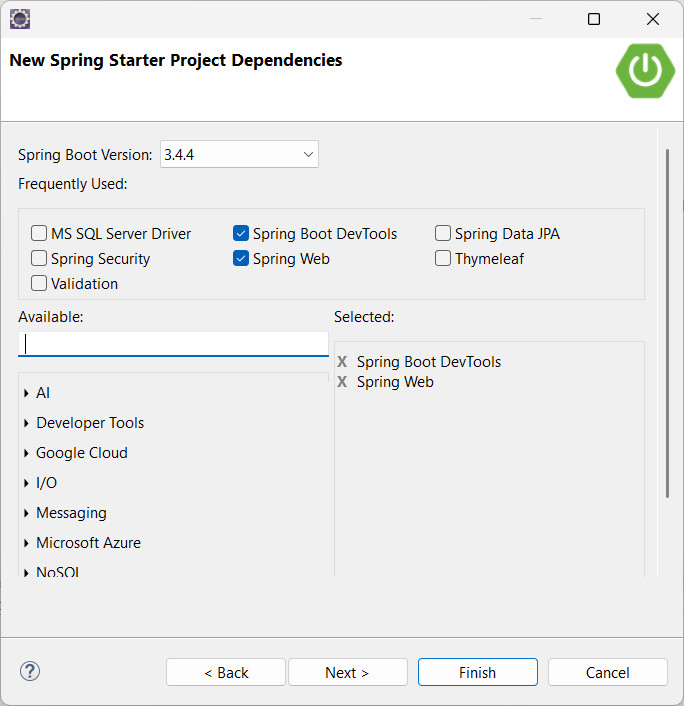
Bước 1: Tạo project session10example1
- Chọn các dependency như sau
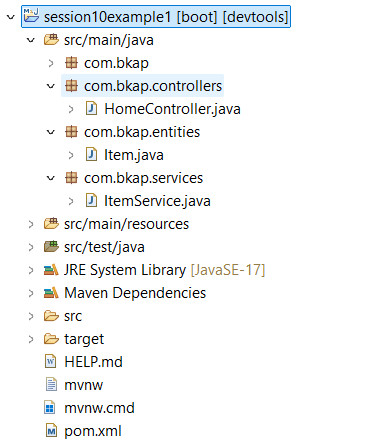
- Cấu trúc project như hình dưới
Bước 2: Code cho các entities, services và controllers
- Code lớp Item
1 2 3 4 5 6 7 8 9 10 11 12 13 14 15 16 17 18 19 20 21 22 23 24 25 26 27 28 29 30 31 32 33 34 35 36 37 38 39 40 41 42 43 |
package com.bkap.entities; public class Item { private Long id; private String name; private int price; private String description; public Item(Long id, String name, int price, String description) { super(); this.id = id; this.name = name; this.price = price; this.description = description; } public Long getId() { return id; } public void setId(Long id) { this.id = id; } public String getName() { return name; } public void setName(String name) { this.name = name; } public int getPrice() { return price; } public void setPrice(int price) { this.price = price; } public String getDescription() { return description; } public void setDescription(String description) { this.description = description; } } |
- Code lớp ItemService
1 2 3 4 5 6 7 8 9 10 11 12 13 14 15 16 17 18 19 20 21 22 23 24 25 26 27 28 29 30 31 32 33 34 35 36 37 38 39 40 41 42 43 44 45 46 47 48 49 50 51 52 |
package com.bkap.services; import java.util.ArrayList; import java.util.Arrays; import java.util.List; import java.util.Optional; import org.springframework.stereotype.Service; import com.bkap.entities.Item; @Service public class ItemService { List<Item> items =new ArrayList<>(Arrays.asList( new Item(1L,"Văn học lớp 9",10000,"sách mới"), new Item(2L,"Văn học lớp 10",13000,"sách mới"), new Item(3L,"Văn học lớp 11",15000,"sách mới") )); public List<Item> getAll() { return items; } public void insert(Item item) { items.add(item); } public void update(Item item) { for (Item i : items) { if (i.getId() == item.getId()) { i.setDescription(item.getDescription()); i.setPrice(item.getPrice()); i.setName(item.getName()); break; } } } public Optional<Item> getById(Long id) { return items.stream().filter(x -> x.getId() == id).findAny(); } public boolean remove(Long id) { Optional<Item> item = items.stream().filter(x -> x.getId() == id).findAny(); if(item.isPresent()) { items.remove(item.get()); return true; } return false; } } |
- Code lớp HomeController
1 2 3 4 5 6 7 8 9 10 11 12 13 14 15 16 17 18 19 20 21 22 23 24 25 26 27 28 29 30 31 32 33 34 35 36 37 38 39 40 41 42 43 44 45 46 47 48 49 50 51 52 53 54 55 56 57 58 59 60 61 62 63 64 65 66 67 68 |
package com.bkap.controllers; import java.util.List; import java.util.Optional; import org.springframework.beans.factory.annotation.Autowired; import org.springframework.http.HttpStatus; import org.springframework.http.ResponseEntity; import org.springframework.web.bind.annotation.DeleteMapping; import org.springframework.web.bind.annotation.GetMapping; import org.springframework.web.bind.annotation.PathVariable; import org.springframework.web.bind.annotation.PostMapping; import org.springframework.web.bind.annotation.PutMapping; import org.springframework.web.bind.annotation.RequestBody; import org.springframework.web.bind.annotation.RestController; import com.bkap.entities.Item; import com.bkap.services.ItemService; @RestController public class HomeController { @Autowired ItemService itemService; @GetMapping("/author") public ResponseEntity<String> getAuthor() { return ResponseEntity.ok("Create by C2308G1"); } @GetMapping("/items") public ResponseEntity<List<Item>> getAll() { return new ResponseEntity<>(itemService.getAll(), HttpStatus.OK); } @GetMapping("/items/{id}") public ResponseEntity<Item> getById(@PathVariable Long id) { Optional<Item> item = itemService.getById(id); if (item.isPresent()) return new ResponseEntity<>(item.get(), HttpStatus.OK); else return new ResponseEntity<>(HttpStatus.NOT_FOUND); } @DeleteMapping("/items/{id}") public ResponseEntity<String> delete(@PathVariable Long id) { if (itemService.remove(id)) return ResponseEntity.ok("Delete successful!"); else return new ResponseEntity<>("Delete unsuccessful", HttpStatus.NOT_FOUND); } @PostMapping("/items") public ResponseEntity<Item> create(@RequestBody Item item) { itemService.insert(item); return new ResponseEntity<>(item,HttpStatus.OK); } @PutMapping("/items/{id}") public ResponseEntity<Item> put(@PathVariable Long id, @RequestBody Item item) { Optional<Item> it = itemService.getById(id); if (it.isPresent() && item.getId()==id) { itemService.update(item); return new ResponseEntity<>(item,HttpStatus.OK); } else return new ResponseEntity<>(HttpStatus.NOT_FOUND); } } |
Bước 3: Chạy ứng dụng
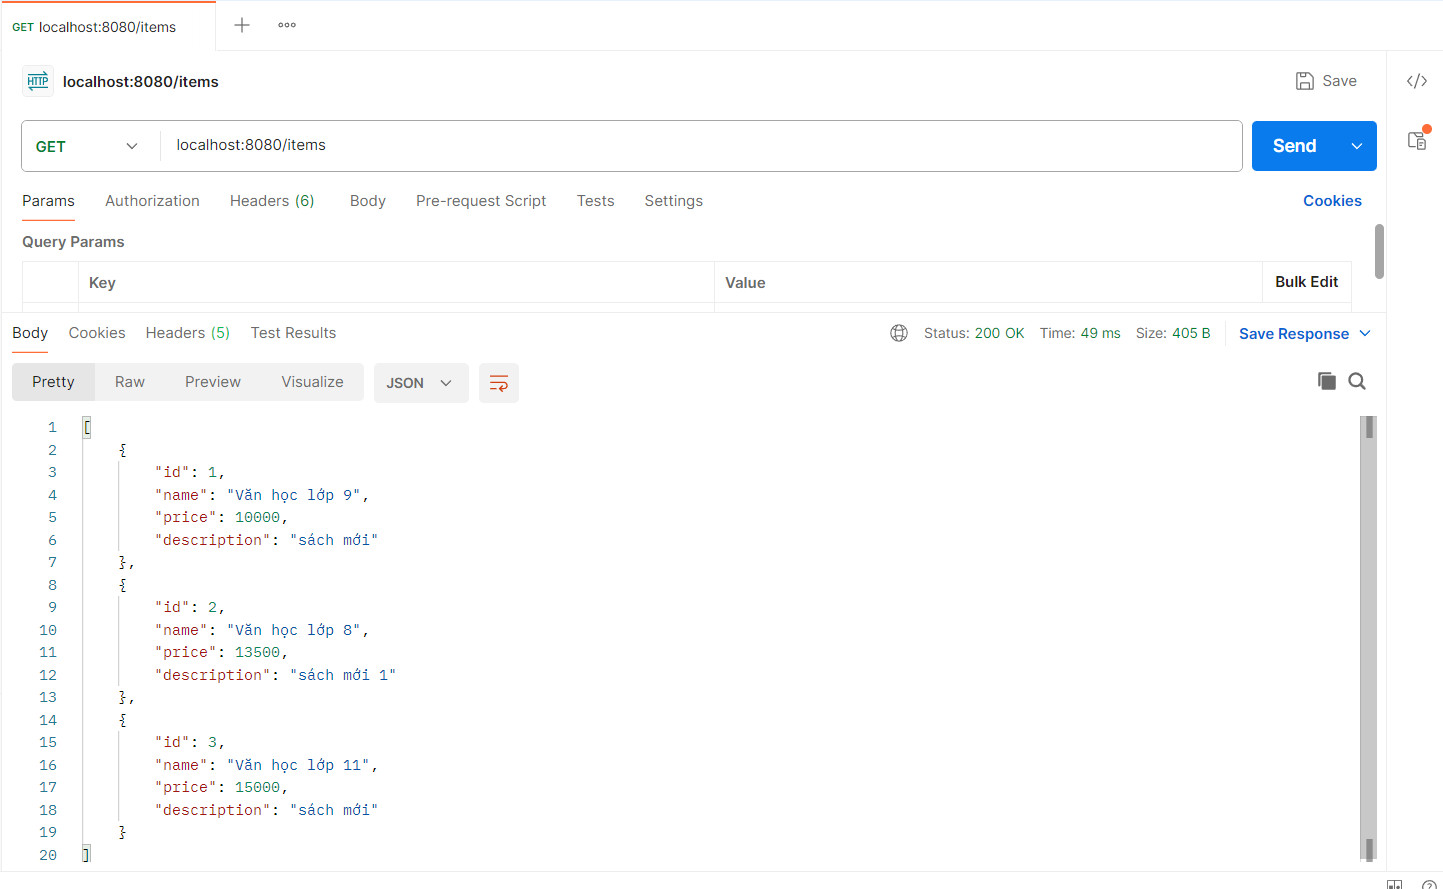
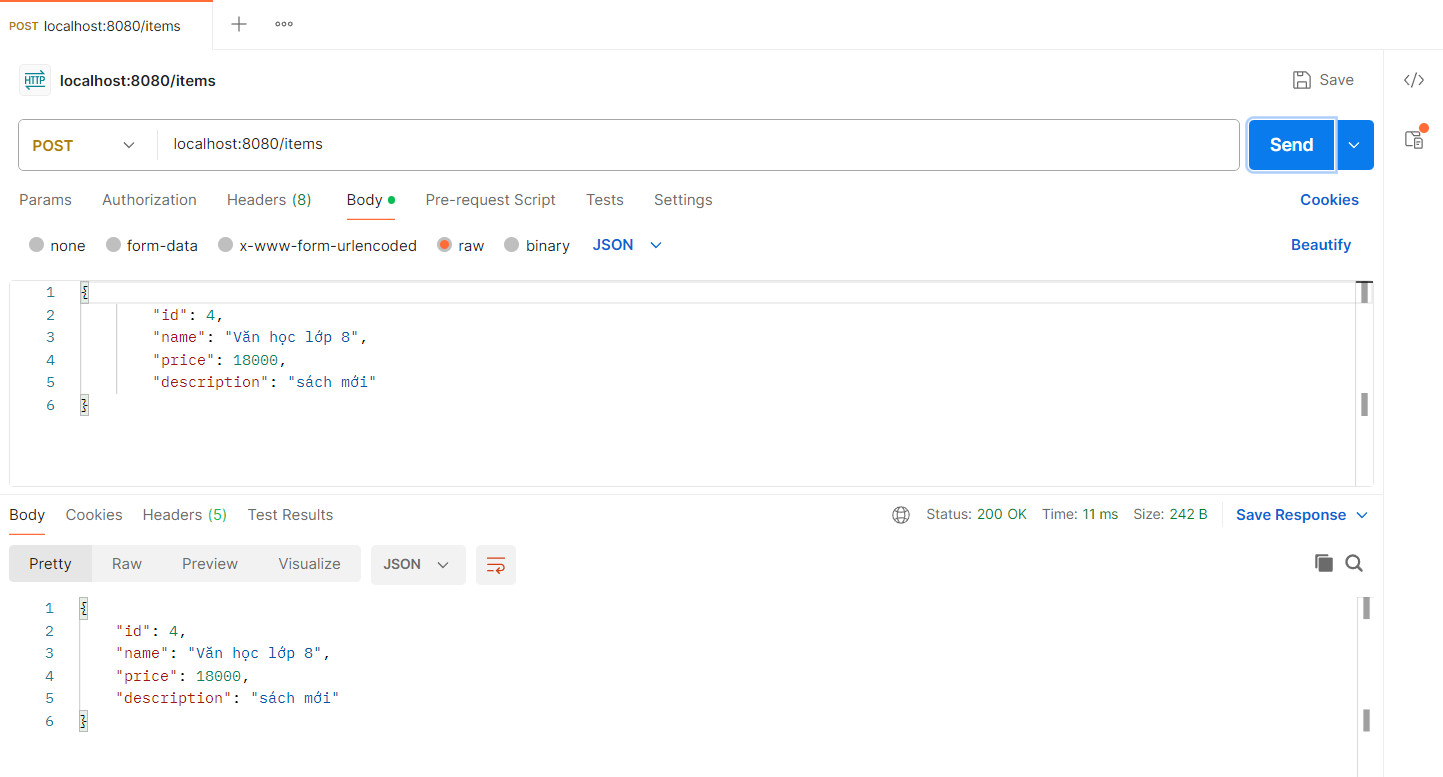
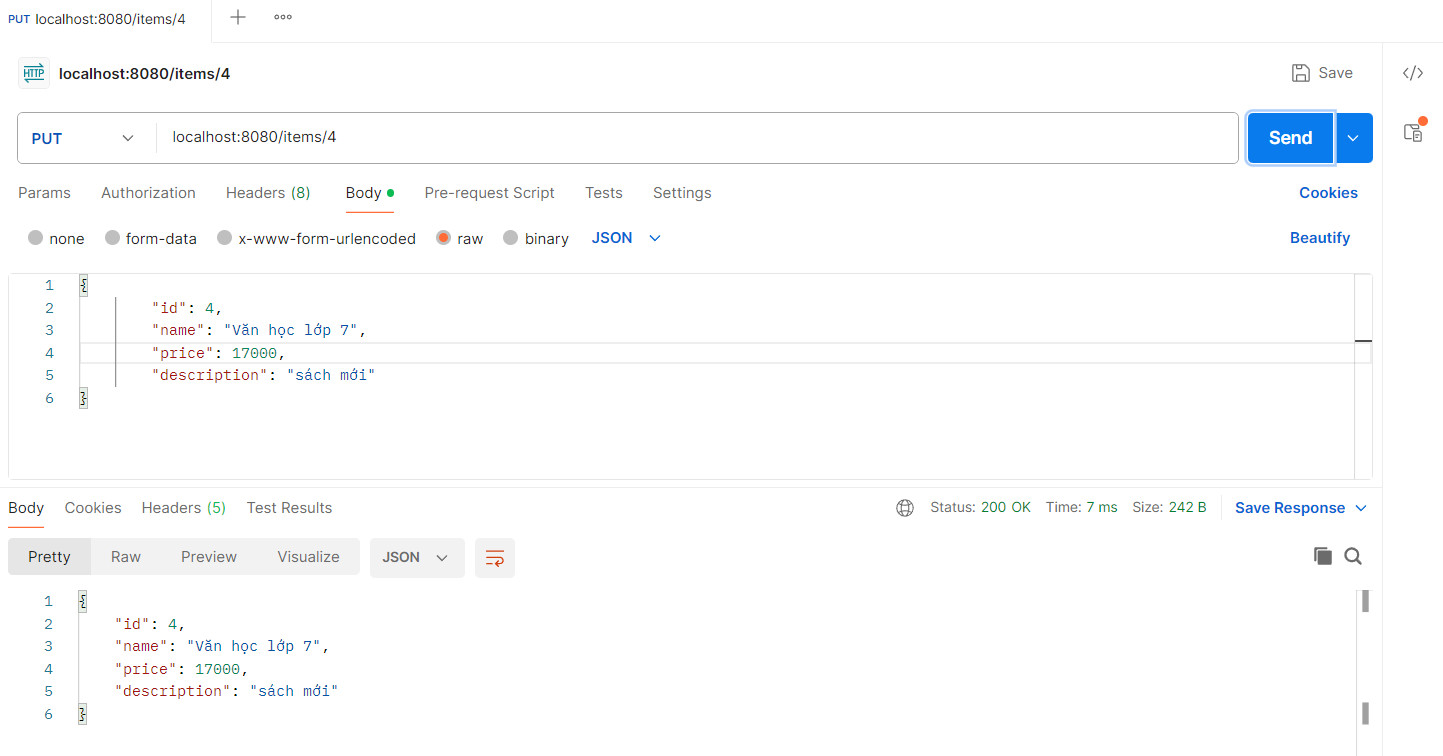
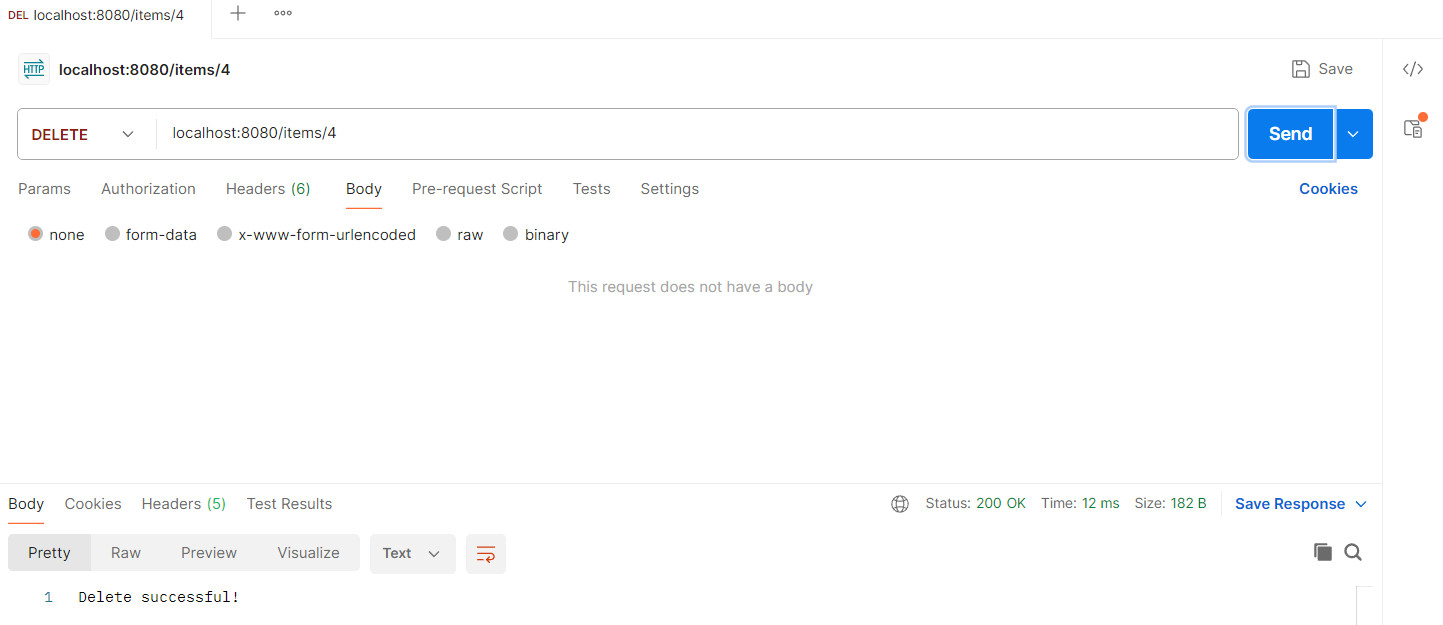
Bước 4: Khởi động Postman và kiểm tra kết quả
Source code tải tại đây
6. Video quay trong buổi dạy lớp C2308G1
thay lời cảm ơn!
Các bài cũ hơn
- Xử lý nghiệp vụ giỏ hàng-đặt hàng cơ bản trong Spring Boot (08:51 AM - 01/04/2025)
- Xây dựng chức năng đăng ký người dùng trong SpringBoot (03:50 PM - 29/03/2025)
- Bảo mật ứng dụng web với Spring Boot (09:12 AM - 28/03/2025)
- Tìm hiểu về Layout trong Thymeleaf (10:58 AM - 25/03/2025)
- Truy xuất database sử dụng Spring Data JPA Phần 3 (03:29 PM - 24/03/2025)

