Flutter cơ bản-Hướng dẫn xây dựng, Validating và Styling cho các Field trên Form trong Flutter
Đăng lúc: 10:18 AM - 06/06/2024 bởi Charles Chung - 2196Form cung cấp một cách đơn giản và trực quan để thu thập thông tin từ người dùng trên ứng dụng Flutter. Trong bài viết này, tôi sẽ hướng dẫn các bạn cách xây dựng một Form cơ bản trong Flutter, tạo kiểu cho nó và xác thực dữ liệu đầu vào của người dùng.

Yêu cầu chung
- Có kiến thức về lập trình Dart
- Máy đã cài đặt môi trường phát triển ứng dụng Flutter
Triển khai Form trong Flutter
- Tạo project Flutter: các bạn có thể thực hiện theo 2 cách:
- Mở Android Studio -> tạo project flutter với tên "example_validate_form"
- Gõ lệnh tạo project tại dòng lệnh
flutter create example_validate_form
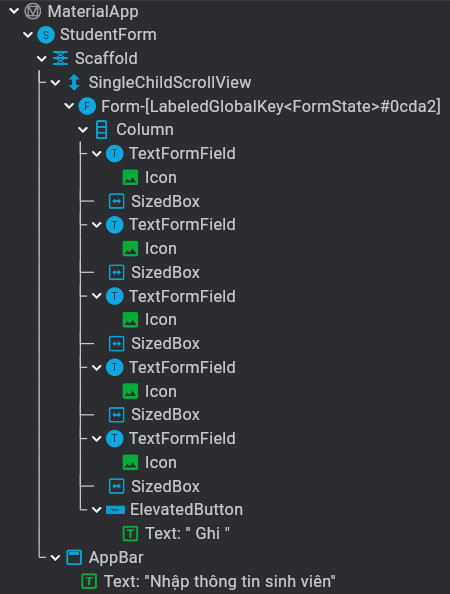
- Cấu trúc các widget trên màn hình
- Mở file main.dart code khung cơ bản theo gợi ý sau
import 'package:flutter/material.dart';

void main() {
  runApp(const MyApp());
}

class MyApp extends StatelessWidget {
  const MyApp({super.key});

  @override
  Widget build(BuildContext context) {
    return MaterialApp(
      title: 'Example Validate Form',
      home: const StudentForm(),
    );
  }
}

class StudentForm extends StatefulWidget {
  const StudentForm({super.key});

  @override
  State<StudentForm> createState() => _StudentFormState();
}

class _StudentFormState extends State<MyHomePage> {
  @override
  Widget build(BuildContext context) {
    return Scaffold(
        appBar: AppBar(
          title: Text('Nhập thông tin sinh viên'),
        ),
        body: SingleChildScrollView(
          child: Column(
            children: [],
          ),
        ));
  }
}
Tạo Form
Flutter cung cấp một Form widget hoạt động như một container để nhóm và xác thực nhiều FormField widget. Để Form thực thi các tác vụ của nó, bạn cần chỉ định GlobalKey sẽ hoạt động như một mã định danh duy nhất cho form. GlobalKey này cũng chứa FormState có thể được sử dụng save,reset hoặc validate từng FormField.
Form Widget yêu cầu mỗi phần tử con phải được bao bọc bằng một FormField widget duy trì trạng thái của trường biểu mẫu sao cho các cập nhật và lỗi xác thực được phản ánh trong giao diện người dùng. Flutter cung cấp một widget tiện dụng là TextFormField, gói gọn chức năng này vào TextField, cho phép bạn dễ dàng chấp nhận và xác thực thông tin đầu vào của người dùng.
Để tạo Form Widget, hãy cập nhật lớp _StudentFormState như sau:
class _StudentFormState extends State<MyHomePage> {
final _formKey = GlobalKey<FormState>();
  @override
  Widget build(BuildContext context) {
    return Scaffold(
        appBar: AppBar(
          title: Text('Nhập thông tin sinh viên'),
        ),
        body: SingleChildScrollView(
          child: Form(
            key: _formKey,
            child: Column(
              children: [
                TextFormField(),
              ],
            ),
          ),
        ));
  }
}
Validating the Form
Để đảm bảo sự chính xác của dữ liệu, điều quan trọng là phải kiểm tra xem thông tin do người dùng cung cấp có chính xác và đúng định dạng hay không. Với Flutter, Tiện ích TextFormField hiển thị chức năng gọi lại trình xác thực có thể được sử dụng để xác thực dữ liệu nhập của người dùng và hiển thị lỗi khi người dùng cố gắng gửi thông tin không hợp lệ. Trình xác thực nhận đầu vào hiện tại của người dùng và sẽ trả về null nếu đầu vào đúng và ở đúng định dạng; nếu không, nó sẽ trả về một thông báo lỗi để tiện ích TextFormField hiển thị. Dưới đây là cách triển khai đơn giản của hàm xác thực:
TextFormField(
    validator: (value) {
        if (value == null || value.isEmpty) {
            return 'Hãy nhập thông tin cho trường này';
        }
        return null;
    },
),
Trình xác thực được thực thi khi bạn gọi hàm validate() được hiển thị bởi FormState key. Bạn có thể thực hiện việc này trong quá trình kích vào nút gửi biểu mẫu như sau:
ElevatedButton(
        onPressed: () {
            if (_formKey.currentState!.validate()) {
                // xử lý khi Form hợp lệ
            } else {
                // Xử lý khi có lỗi xảy ra
            }
        },
        child: Text('Gửi'))
Để giảm lỗi nhập của người dùng, tiện ích TextFormField hiển thị các đối số khác được sử dụng để lọc dữ liệu đầu vào cũng như thay đổi kiểu nhập bằng bàn phím (áp dụng cho trường chỉ nhập số):
TextFormField(
    inputFormatters: [FilteringTextInputFormatter.digitsOnly],
    keyboardType: TextInputType.number,
),
Styleing the Form
Thiết kế Form tác động lớn đến trải nghiệm người dùng. Hình thức được tổ chức tốt và đẹp mắt có thể là sự khác biệt giữa việc giữ chân người dùng và nhận được những đánh giá ứng dụng tệ. Trong Flutter, tiện ích TextFormField có thể được styling để cải thiện giao diện người dùng và mang lại trải nghiệm người dùng tốt hơn. Điều này được thực hiện bằng cách sử dụng đối số inputDecoration, cho phép bạn thay đổi các thuộc tính như icon, hints, label, border, color, style, v.v. Dưới đây là một style cho một TextFieldForm:
TextFormField(
    decoration: InputDecoration(
      enabledBorder: OutlineInputBorder(
      borderSide:BorderSide(color: Colors.blueGrey, width: 2.0)),
      border: OutlineInputBorder(borderSide: BorderSide()),
      fillColor: Colors.white,
      filled: true,
      prefixIcon: Icon(Icons.account_box_outlined),
      suffixIcon: Icon(Icons.check_box_outlined),
      hintText: 'Charles Chung',
      labelText: 'Họ và tên',
      ),
),
Get Values in Form
Để lấy giá trị của các TextField trên Form, bạn cần phải khai báo các TextEditingController cho từng TextField qua đối số controller của TextField. Hãy xem đoạn code sau
class _StudentFormState extends State<StudentForm> {
  final _formKey = GlobalKey<FormState>();
  final _nameController = TextEditingController();
  @override
  Widget build(BuildContext context) {
    return Scaffold(
      appBar: AppBar(
        title: Text('Nhập thông tin sinh viên'),
      ),
      body: SingleChildScrollView(
        child: Form(
          key: _formKey,
          child: Column(
            children: [
              TextFormField(
                controller: _nameController,
                decoration: const InputDecoration(
                    enabledBorder: OutlineInputBorder(
                    borderSide: BorderSide(color: Colors.grey, width: 2.0)),
                    border: OutlineInputBorder(borderSide: BorderSide()),
                    fillColor: Colors.white,
                    prefixIcon: Icon(Icons.account_box_outlined),
                    hintText: 'Họ và tên',
                ),
                validator: (value) {
                  if (value == null || value.isEmpty) {
                    return 'Hãy nhập họ và tên';
                  }
                  return null;
                },
              ),
            ],
          ),
        ),
      ),
    );
  }

  @override
  void dispose() {
    _nameController.dispose();
    super.dispose();
  }
}
Code hoàn chỉnh
import 'package:flutter/material.dart';
import 'package:flutter/services.dart';

void main() {
  runApp(const MyApp());
}

class MyApp extends StatelessWidget {
  const MyApp({super.key});
  @override
  Widget build(BuildContext context) {
    return MaterialApp(
      title: 'Example02-Lab12',
      home: StudentForm(),
      debugShowCheckedModeBanner: false,
    );
  }
}

class StudentForm extends StatefulWidget {
  @override
  State<StatefulWidget> createState() => _StudentFormState();
}

class _StudentFormState extends State<StudentForm> {
  final _formKey = GlobalKey<FormState>();
  final _nameController = TextEditingController();
  final _emailController = TextEditingController();
  final _phoneController = TextEditingController();
  final _streetController = TextEditingController();
  final _cityController = TextEditingController();
  @override
  Widget build(BuildContext context) {
    return Scaffold(
      appBar: AppBar(
        title: Text('Nhập thông tin sinh viên'),
      ),
      body: SingleChildScrollView(
        padding: const EdgeInsets.all(10.0),
        child: Form(
          key: _formKey,
          child: Column(
            children: [
              TextFormField(
                controller: _nameController,
                decoration: const InputDecoration(
                    enabledBorder: OutlineInputBorder(
                    borderSide: BorderSide(color: Colors.grey, width: 2.0)),
                    border: OutlineInputBorder(borderSide: BorderSide()),
                    fillColor: Colors.white,
                    prefixIcon: Icon(Icons.account_box_outlined),
                    hintText: 'Họ và tên',
                ),
                validator: (value) {
                  if (value == null || value.isEmpty) {
                    return 'Hãy nhập họ và tên';
                  }
                  return null;
                },
              ),
              SizedBox(height: 10.0,),
              TextFormField(
                controller: _emailController,
                decoration: const InputDecoration(
                    enabledBorder: OutlineInputBorder(
                        borderSide: BorderSide(color: Colors.grey, width: 2.0)),
                    border: OutlineInputBorder(borderSide: BorderSide()),
                    fillColor: Colors.white,
                    prefixIcon: Icon(Icons.email_outlined),
                    hintText: 'Email'),
                validator: (value) {
                  if (value == null || value.isEmpty) {
                    return 'Hãy nhập email';
                  }
                  return null;
                },
              ),
              SizedBox(height: 10.0,),
              TextFormField(
                controller: _phoneController,
                inputFormatters: [FilteringTextInputFormatter.digitsOnly],
                keyboardType: TextInputType.number,
                decoration: const InputDecoration(
                    enabledBorder: OutlineInputBorder(
                        borderSide: BorderSide(color: Colors.grey, width: 2.0)),
                    border: OutlineInputBorder(borderSide: BorderSide()),
                    fillColor: Colors.white,
                    prefixIcon: Icon(Icons.phone_android_outlined),
                    hintText: 'Điện thoại',
                    ),
                validator: (value) {
                  if (value == null || value.isEmpty) {
                    return 'Hãy nhập điện thoại';
                  }
                  return null;
                },
              ),
              SizedBox(height: 10.0,),
              TextFormField(
                controller: _streetController,
                decoration: const InputDecoration(
                    enabledBorder: OutlineInputBorder(
                        borderSide: BorderSide(color: Colors.grey, width: 2.0)),
                    border: OutlineInputBorder(borderSide: BorderSide()),
                    fillColor: Colors.white,
                    prefixIcon: Icon(Icons.streetview_outlined),
                    hintText: 'Địa chỉ',
                    ),
                validator: (value) {
                  if (value == null || value.isEmpty) {
                    return 'Hãy nhập địa chỉ';
                  }
                  return null;
                },
              ),
              SizedBox(height: 10.0,),
              TextFormField(
                controller: _cityController,
                decoration: const InputDecoration(
                    enabledBorder: OutlineInputBorder(
                        borderSide: BorderSide(color: Colors.grey, width: 2.0)),
                    border: OutlineInputBorder(borderSide: BorderSide()),
                    fillColor: Colors.white,
                    prefixIcon: Icon(Icons.location_city_outlined),
                    hintText: 'Thành phố',),
                validator: (value) {
                  if (value == null || value.isEmpty) {
                    return 'Hãy nhập thành phố';
                  }
                  return null;
                },
              ),
              SizedBox(height: 10.0,),
              ElevatedButton(
                  style: ElevatedButton.styleFrom(
                      minimumSize: const Size.fromHeight(50)),
                  onPressed: () {
                    if (_formKey.currentState!.validate()) {
                      ScaffoldMessenger.of(context).showSnackBar(SnackBar(content: Text('Hello ${_nameController.text}, thông tin của bạn đã được gửi đi.')));
                    } else {}
                  },
                  child: Text(' Ghi '))
            ],
          ),
        ),
      ),
    );
  }

  @override
  void dispose() {
    _nameController.dispose();
    _emailController.dispose();
    _phoneController.dispose();
    _streetController.dispose();
    _cityController.dispose();
    super.dispose();
  }
}
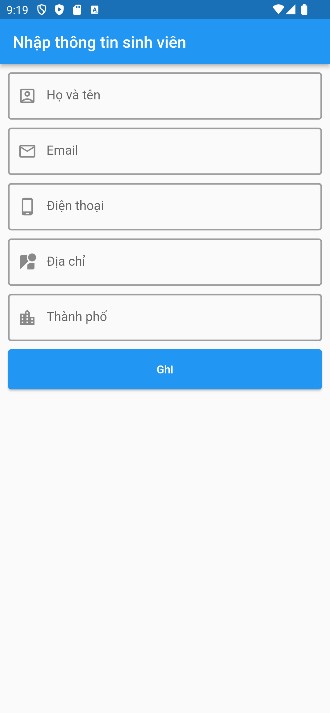
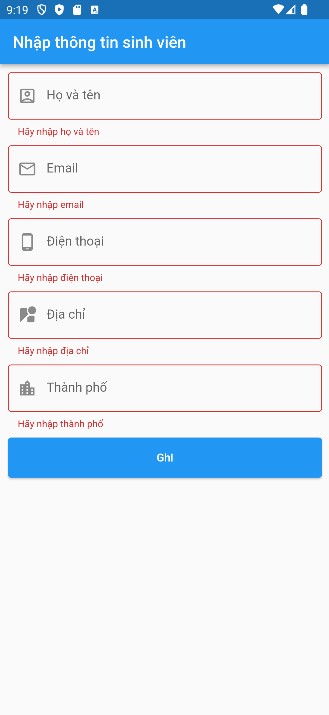
Màn hình kết quả
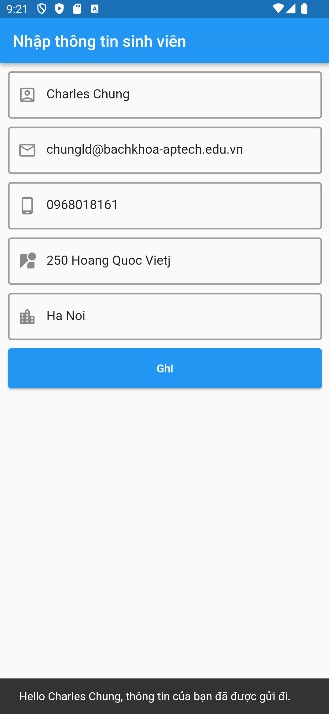
thay lời cảm ơn!
Các bài cũ hơn
- Bảo mật phân quyền người dùng trong ứng dụng Web với Spring Boot 3 Security (03:02 PM - 03/06/2024)
- Hướng dẫn cài đặt môi trường lập trình Dart và Flutter trên Windows 10 từ A-Z (03:47 PM - 15/05/2024)
- Phát hiện khuôn mặt người trong ảnh sử dụng thư viện Haar Cascade với OpenCV-Python (09:53 AM - 27/03/2024)
- Hướng dẫn đăng nhập trên trang chủ và trang quản trị Spring MVC-MongoDB (05:58 PM - 21/03/2024)
- Hướng dẫn xây dựng Layout trang User và Admin trong Spring MVC (07:25 PM - 18/03/2024)


