Chèn watermark với Text và Logo vào hình ảnh trong ASP Net Core
Đăng lúc: 11:51 AM - 09/09/2024 bởi Charles Chung - 1581Watermark được sử dụng để bảo vệ bản quyền, tránh bị sao chép dữ liệu trái phép. Watermark có thể là tên, hình ảnh, chữ ký hoặc số điện thoại của tác giả. Trong bài viết này tôi sẽ hướng dẫn chèn watermark là Text và Logo vào hình ảnh sử dụng ASP.NET Core

Các bước thực hiện
1. Tạo ứng dụng ASP.NET CORE MVC
- Mở Visual Studio 2022 - Tạo mới Project ASP.NET CORE MVC
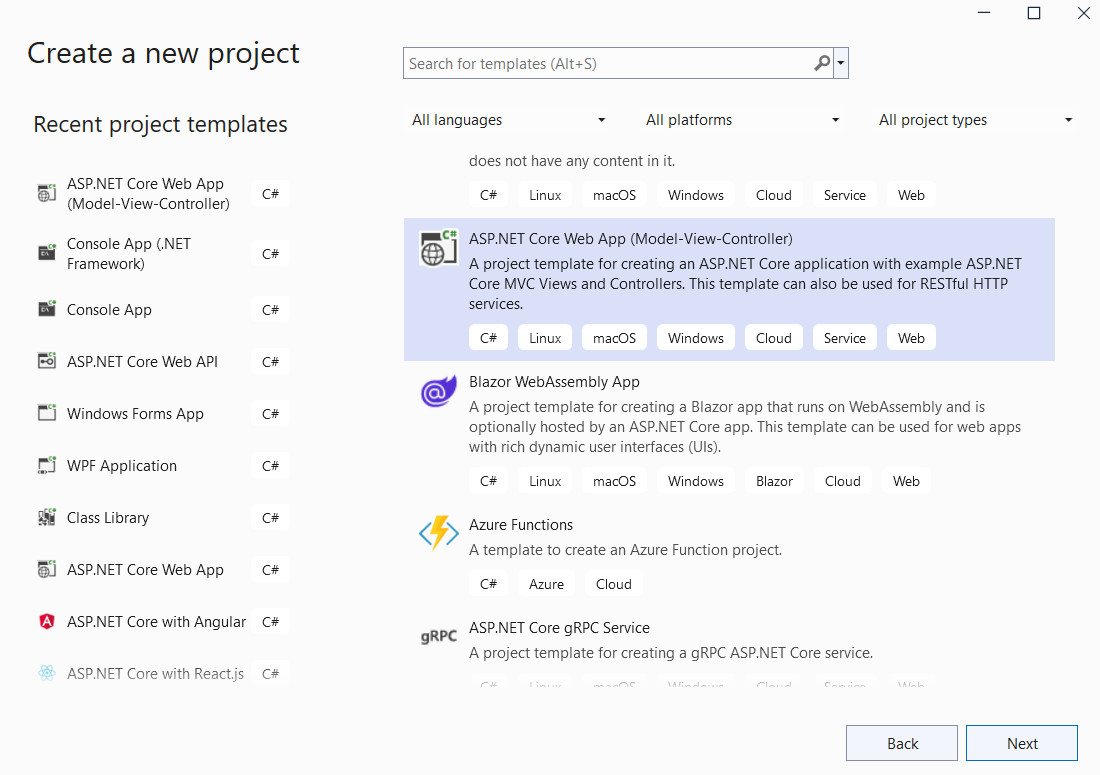
- Click Next
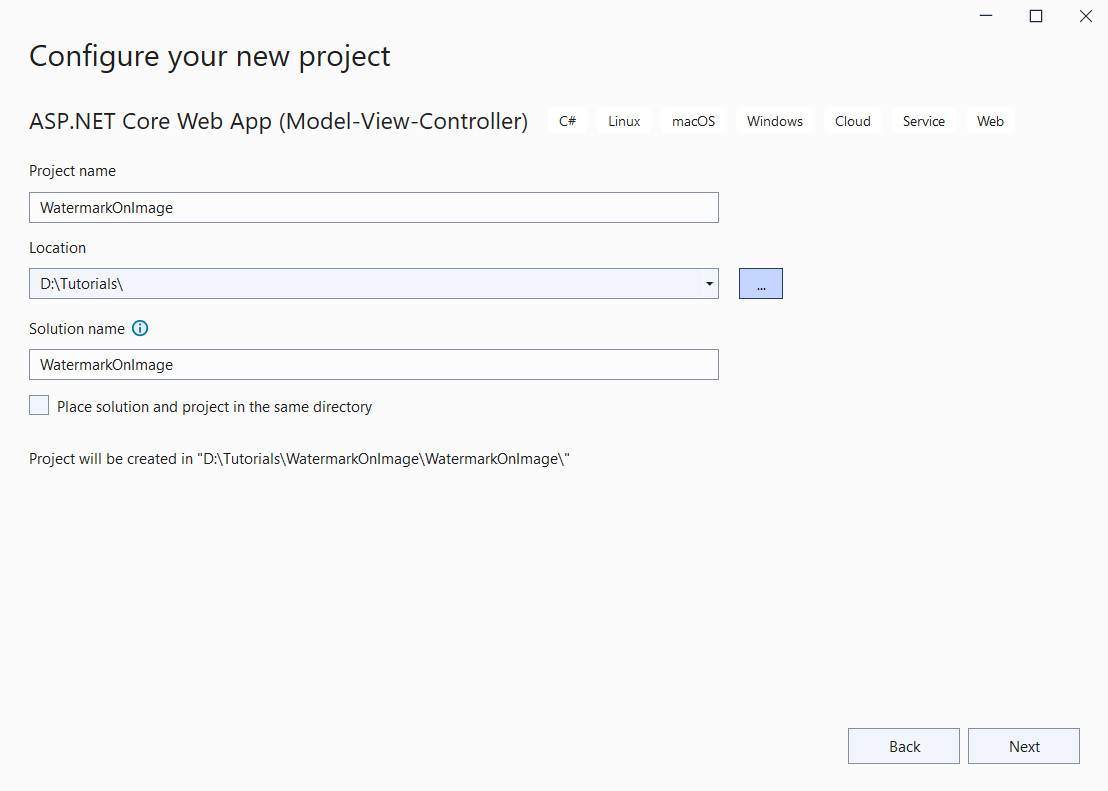
- Click Next
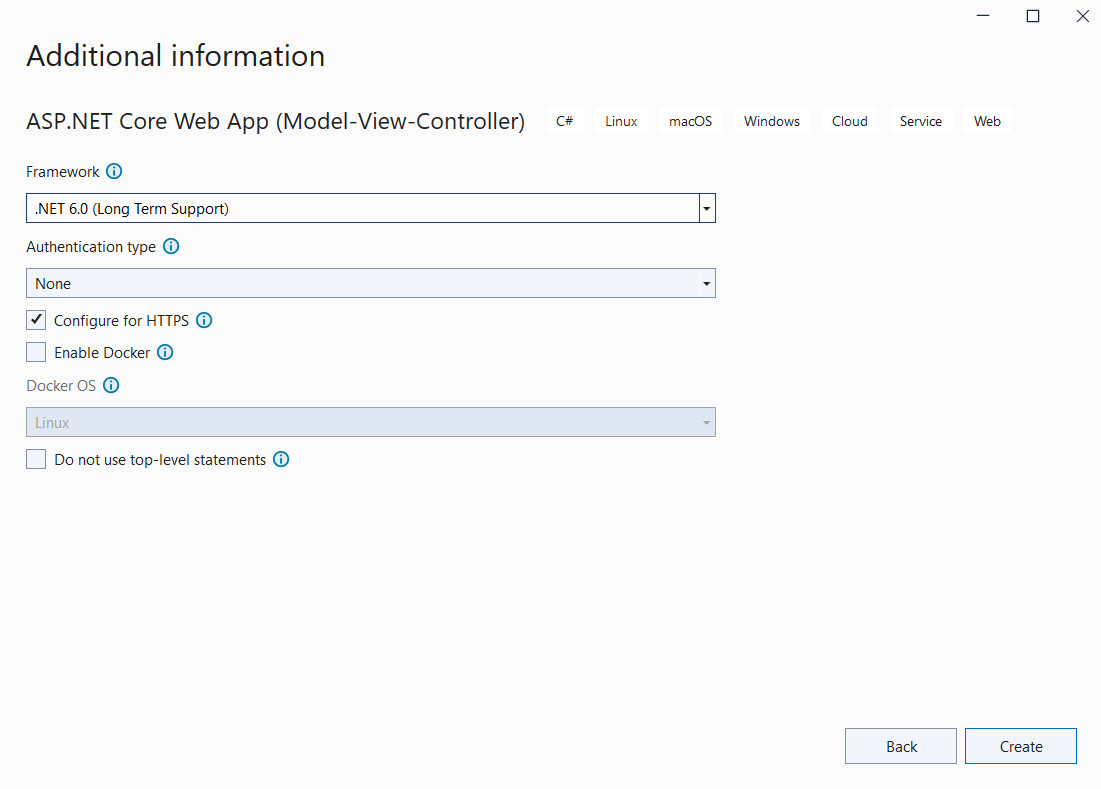
- Click Create
2. Cài đặt thư viện xử lý hình ảnh System.Drawing.Common trong .net core
- Chuột phải vào project chọn Manage NuGet Package...
- Tìm System.Drawing.Common rồi cài bản 7.0
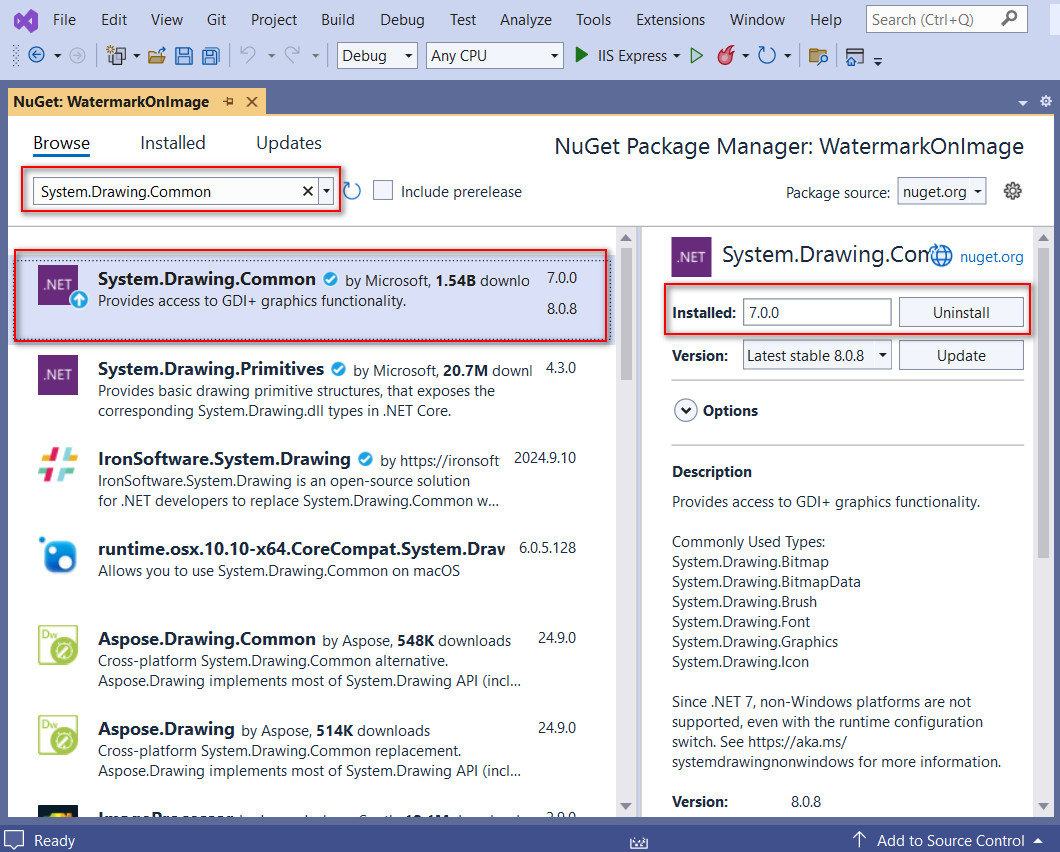
3. Chuẩn bị tài nguyên
- Tạo thư mục images trong wwwroot để lưu trữ ảnh upload
- Copy ảnh logo.png bạn muốn vào thư mục wwwroot/images
- Tạo thư mục temp trong images để lưu ảnh upload tạm thời
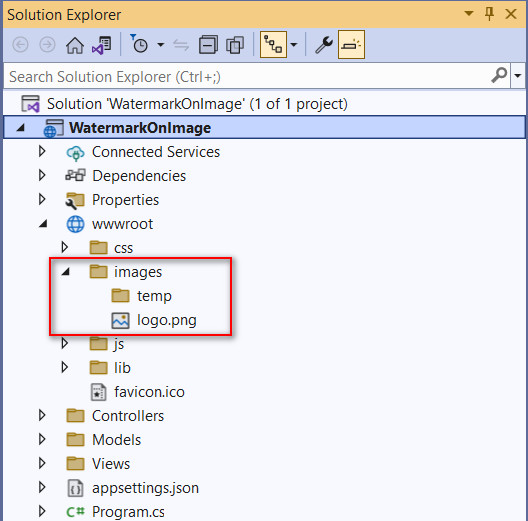
4. Code xử lý chèn watermark
- Trong thư mục Models tạo lớp Watermark và code như gợi ý bên dưới
using System.Drawing;
using System.Drawing.Imaging;

namespace WatermarkOnImage.Models
{
    public class Watermark
    {
        //Phương thức tạo logo watermark cho ảnh
        public void AddLogo(string inputImagePath, string logoPath, string outputImagePath)
        {
            // Tải hình ảnh gốc
            using (Bitmap bitmap = new Bitmap(inputImagePath))
            {
                // Tải hình ảnh watermark
                using (Bitmap watermark = new Bitmap(logoPath))
                {
                    // Tạo đối tượng Graphics từ hình ảnh gốc
                    using (Graphics graphics = Graphics.FromImage(bitmap))
                    {
                        // Cài đặt thuộc tính cho watermark
                        int watermarkWidth = watermark.Width;
                        int watermarkHeight = watermark.Height;
                        int margin = 15; // Lề của watermark

                        // Xác định vị trí watermark (góc dưới bên phải)
                        int x = bitmap.Width - watermarkWidth - margin;
                        int y = bitmap.Height - watermarkHeight - margin;

                        // Cài đặt độ trong suốt cho watermark
                        ColorMatrix colorMatrix = new ColorMatrix
                        {
                            Matrix33 = 1.0f // Độ trong suốt (1.0 = 100%)
                        };
                        ImageAttributes imageAttributes = new ImageAttributes();
                        imageAttributes.SetColorMatrix(colorMatrix, ColorMatrixFlag.Default, ColorAdjustType.Bitmap);

                        // Vẽ watermark lên hình ảnh
                        graphics.DrawImage(watermark, new Rectangle(x, y, watermarkWidth, watermarkHeight),
                                           0, 0, watermarkWidth, watermarkHeight,
                                           GraphicsUnit.Pixel, imageAttributes);
                    }

                    // Lưu hình ảnh với watermark
                    bitmap.Save(outputImagePath, ImageFormat.Jpeg);
                }
            }
        }
        //Phương thức tạo text watermark cho ảnh
        public void AddText(string inputImagePath, string outputImagePath, string watermarkText)
        {
            // Tải hình ảnh gốc
            using (Bitmap image = new Bitmap(inputImagePath))
            {
                using (Graphics graphics = Graphics.FromImage(image))
                {
                    // Gán font và màu cho watermark
                    Font watermarkFont = new Font("Arial", 30, FontStyle.Bold, GraphicsUnit.Pixel);
                    Color watermarkColor = Color.FromArgb(255, 255, 255, 255); // Semi-transparent white

                    // Tạo một brush trong suốt
                    SolidBrush watermarkBrush = new SolidBrush(watermarkColor);

                    // Tạo vị trí của watermark
                    string format = watermarkText;
                    SizeF textSize = graphics.MeasureString(format, watermarkFont);
                    Point position = new Point(image.Width - (int)textSize.Width - 10, image.Height - (int)textSize.Height - 10);

                    // Vẽ watermark lên hình ảnh
                    graphics.DrawString(format, watermarkFont, watermarkBrush, position);

                    // Lưu kết quả
                    image.Save(outputImagePath, ImageFormat.Jpeg);
                }
            }
        }
    }
}
5. Code Controller
- Mở HomeController.cs và code theo gợi ý sau
public class HomeController : Controller
    {
        string url_file_logo = "wwwroot/images/logo.png";
        string text = "HANAM88.COM";
        string dir_temp = "wwwroot/images/temp";
        string dir_output = "wwwroot/images";
        Watermark watermark=new Watermark();
        public IActionResult Index()
        {
            return View();
        }

        public IActionResult CreateText()
        {
            return View();
        }
        [HttpPost]
        public IActionResult CreateText(IFormFile fileupload)
        {
            if (fileupload != null && fileupload.Length > 0)
            {
                Watermark watermark = new Watermark();
                var path_file_temp = Path.Combine(Directory.GetCurrentDirectory(), dir_temp, fileupload.FileName);
                using (var stream = System.IO.File.Create(path_file_temp))
                {
                    fileupload.CopyTo(stream);
                }
                var path_file_ouput = Path.Combine(Directory.GetCurrentDirectory(), dir_output, fileupload.FileName);
                watermark.AddText(path_file_temp, path_file_ouput, text);
                System.IO.File.Delete(path_file_temp);
                ViewBag.url_image = dir_output.Substring(7) + "/" + fileupload.FileName;
            }
            return View();
        }

        public IActionResult CreateLogo()
        {
            return View();
        }
        [HttpPost]
        public IActionResult CreateLogo(IFormFile fileupload)
        {
            if (fileupload!=null && fileupload.Length > 0)
            {
                Watermark watermark = new Watermark();
                var path_file_temp = Path.Combine(Directory.GetCurrentDirectory(), dir_temp, fileupload.FileName);
                using (var stream = System.IO.File.Create(path_file_temp))
                {
                    fileupload.CopyTo(stream);
                }
                var path_file_logo = Path.Combine(Directory.GetCurrentDirectory(), url_file_logo);
                var path_file_ouput = Path.Combine(Directory.GetCurrentDirectory(), dir_output, fileupload.FileName);
                watermark.AddLogo(path_file_temp, path_file_logo, path_file_ouput);
                System.IO.File.Delete(path_file_temp);
                ViewBag.url_image = dir_output.Substring(7) + "/" + fileupload.FileName;
            }
            return View();
        }
    }
6. Tạo các views
- Mở tệp Views/Home/Index.cshtml và thêm code sau
<div class="text-center">
    <h1 class="display-4">Tạo watermark cho hình ảnh</h1>
    <p><a asp-action="CreateText" asp-controller="Home">Tạo text watermark cho hình ảnh</a></p>
    <p><a asp-action="CreateLogo" asp-controller="Home">Tạo logo watermark cho hình ảnh</a></p>
</div>
- Tạo tệp Views/Home/CreateText.cshtml và thêm code sau
<h1>Upload ảnh và thêm Text Watermark</h1>
<form method="post" enctype="multipart/form-data">
    <input type="file" name="fileupload" accept="image/png, image/jpeg" /><button>Upload</button>
</form>
<img src="@ViewBag.url_image" width="500" />
- Tạo tệp Views/Home/CreateText.cshtml và thêm code sau
<h1>Upload ảnh và thêm Logo Watermark</h1>
<form method="post" enctype="multipart/form-data">
    <input type="file" name="fileupload" accept="image/png, image/jpeg" /><button>Upload</button>
</form>
<img src="@ViewBag.url_image" width="500"/>
7. Chạy ứng dụng và kiểm tra kết quả
Link tải source code tại đây
thay lời cảm ơn!
Các bài cũ hơn
- Flutter căn bản-Thiết kế màn hình hiển thị danh sách sản phẩm và Navigator tới màn hình chi tiết (09:44 AM - 17/07/2024)
- Flutter căn bản-Gửi Request POST-GET-PUT-DELETE tới Restful API đính kèm hình ảnh (09:05 AM - 14/07/2024)
- Flutter căn bản-Làm việc với cơ sở dữ liệu SQLite-CRUD (08:55 AM - 11/07/2024)
- Flutter cơ bản-Gửi nhận dữ liệu với post và get kèm JWT tới Web API (02:20 PM - 26/06/2024)
- Flutter cơ bản-Sử dụng font chữ (11:49 AM - 26/06/2024)


