Truy xuất database sử dụng Spring Data JPA Phần 2
Đăng lúc: 02:14 PM - 23/03/2025 bởi Charles Chung - 1718Tiếp theo source code truy xuất database sử dụng Spring Data JPA Phần 1, trong phần này tôi sẽ hướng dẫn các bạn phân trang dữ liệu trong Spring Data JPA

1. Giới thiệu
Để phân trang dữ liệu trong Spring Data JPA, bạn có thể sử dụng đối tượng Pageable để xác định trang, số lượng phần tử mỗi trang và sắp xếp dữ liệu. Đây là một tính năng rất mạnh mẽ mà Spring Data JPA cung cấp sẵn, giúp bạn dễ dàng xử lý phân trang mà không cần viết nhiều mã.
2 Ví dụ demo
Tiếp tục sử dụng source code bài Truy xuất database sử dụng Spring Data JPA Phần 1 chúng ta hiệu chỉnh lại một số code như sau
Bước 1: Sửa lại code tìm kiếm trong tệp ProductRepository
public interface ProductRepository extends JpaRepository<Product, Long> {
	//Tìm kiếm theo sản phẩm có chứa tên và theo trạng thái (chỉ cần đặt tên phương thức theo đúng quy tắc)
	List<Product> findByProductNameContainingAndActive(String name, boolean active);
}
Bước 2: Sửa lại code trong tệp ProductService
package com.bkap.services;

import java.util.List;

import org.springframework.beans.factory.annotation.Autowired;
import org.springframework.data.domain.Page;
import org.springframework.data.domain.PageRequest;
import org.springframework.data.domain.Pageable;
import org.springframework.stereotype.Service;

import com.bkap.entities.Product;
import com.bkap.repositories.ProductRepository;

@Service
public class ProductService {
	@Autowired
	private ProductRepository repo;

	public List<Product> getAll(){
		return repo.findAll();
	}
	public void save(Product product) {
		repo.save(product);
	}
	public Product getById(long id) {
		return repo.findById(id).get();
	}
	public void delete(long id) {
		repo.deleteById(id);
	}
	//phần chỉnh sửa và bổ sung
	public List<Product> searchNameAndActive(String name, boolean active){
		return repo.findByProductNameContainingAndActive(name, active);
	}
	public Page<Product> paging(int page, int pagesize){
		Pageable pageable=PageRequest.of(page, pagesize);
		return repo.findAll(pageable);
	}
}
Bước 3: Sửa lại code trong tệp ProductController
package com.bkap.controllers;

import java.util.List;

import org.springframework.beans.factory.annotation.Autowired;
import org.springframework.data.domain.Page;
import org.springframework.stereotype.Controller;
import org.springframework.ui.Model;
import org.springframework.validation.BindingResult;
import org.springframework.web.bind.annotation.GetMapping;
import org.springframework.web.bind.annotation.PathVariable;
import org.springframework.web.bind.annotation.PostMapping;

import com.bkap.entities.Product;
import com.bkap.services.ProductService;

import jakarta.validation.Valid;


@Controller
public class ProductController {
	@Autowired
	ProductService productService;

	@GetMapping({"/","/san-pham"})
	public String index(Integer page, Model model) {
		page=(page==null || page<=0)?0:page-1;
		Page<Product> pageproduct=productService.paging(page,2);
		List<Product> products=pageproduct.getContent();
		model.addAttribute("products",products);
		model.addAttribute("currentPage", page+1);
	    model.addAttribute("totalPages", pageproduct.getTotalPages());
	    model.addAttribute("totalItems", pageproduct.getTotalElements());
		return "index";
	}
	@GetMapping("/san-pham/tim-kiem")
	public String search(String searchname, int active, Model model) {
		model.addAttribute("active",active);
		searchname=searchname.isEmpty()?"":searchname;
		model.addAttribute("searchname",searchname);
		model.addAttribute("products",productService.searchNameAndActive(searchname,active==1?true:false));
		return "index";
	}
	@GetMapping("/san-pham/them-moi")
	public String create(Model model) {
		model.addAttribute("product",new Product());
		return "create";
	}

	@PostMapping("/san-pham/ghi")
	public String create(@Valid Product product, BindingResult result, Model model) {
		if(result.hasErrors()) {
			model.addAttribute("product",product);
			return "create";
		}
		productService.save(product);
		return "redirect:/san-pham";
	}

	@GetMapping("/san-pham/xoa/{id}")
	public String delete(@PathVariable int id) {
		productService.delete(id);
		return "redirect:/san-pham";
	}

	@GetMapping("/san-pham/chi-tiet/{id}")
	public String detail(@PathVariable int id,Model model) {
		model.addAttribute("product",productService.getById(id));
		return "detail";
	}

	@GetMapping("/san-pham/sua/{id}")
	public String edit(@PathVariable int id, Model model) {
		model.addAttribute("product",productService.getById(id));
		return "edit";
	}

	@PostMapping("/san-pham/cap-nhat")
	public String edit(@Valid Product product, BindingResult result, Model model) {
		if(result.hasErrors()) {
			model.addAttribute("product",product);
			return "edit";
		}
		productService.save(product);
		return "redirect:/san-pham";
	}
}
Bước 4: Sửa lại code trong tệp index.html
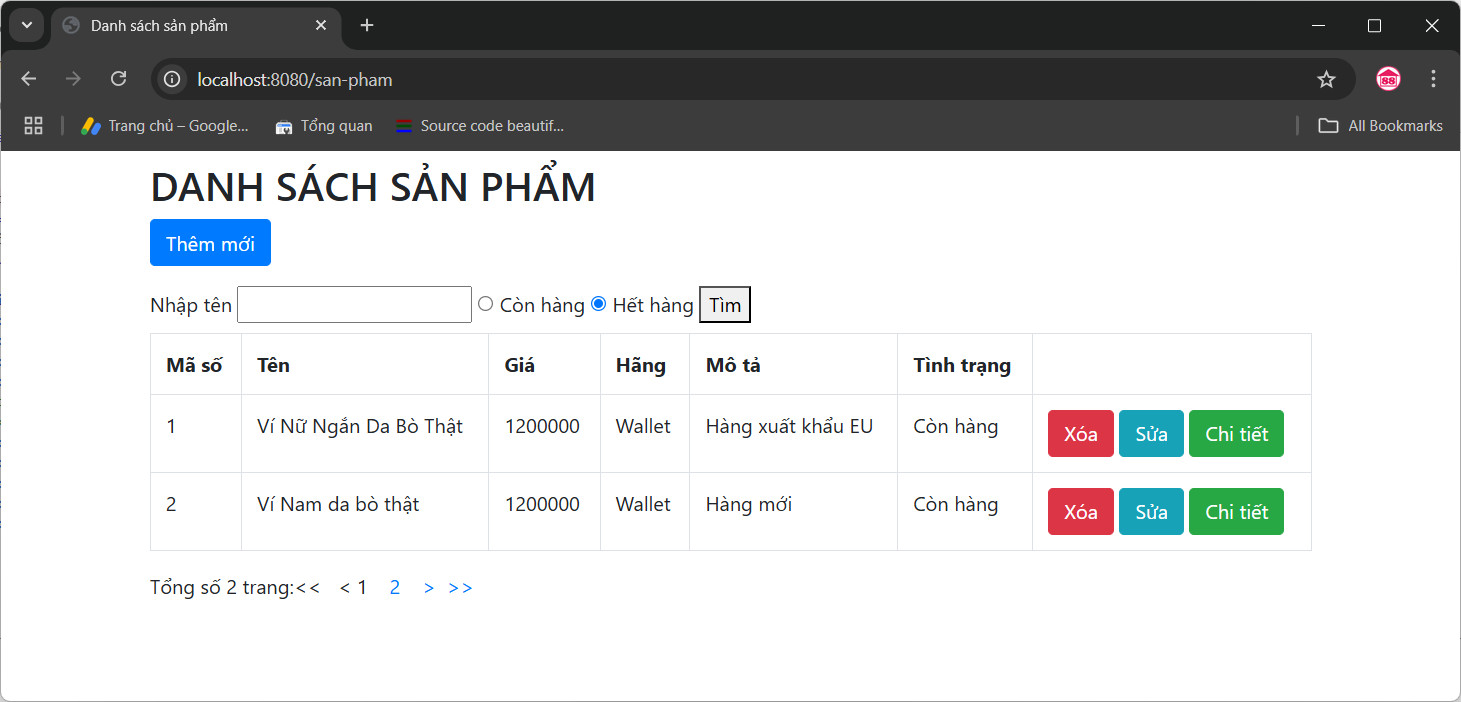
<!DOCTYPE html> <html xmlns:th="http://www.thymeleaf.org"> <head> <meta charset="UTF-8"> <title>Danh sách sản phẩm</title> <link rel="stylesheet" href="https://cdn.jsdelivr.net/npm/bootstrap@4.6.2/dist/css/bootstrap.min.css" /> </head> <body> <div class="container"> <h2 class="mt-2">DANH SÁCH SẢN PHẨM</h2> <p> <a th:href="@{/san-pham/them-moi}" class="btn btn-primary">Thêm mới</a> </p> <div> <form th:action="@{/san-pham/tim-kiem}" method="get"> <span>Nhập tên </span><input type="text" name="searchname" th:value="${searchname}" /> <input th:if="${active}" type="radio" name="active" checked value="1" /> <input th:unless="${active}" type="radio" name="active" value="1" /> Còn hàng <input th:if="${active}" type="radio" name="active" value="0" /> <input th:unless="${active}" type="radio" checked name="active" value="0" /> Hết hàng <button>Tìm</button> </form> </div> <table class="table table-bordered mt-2"> <tr> <th>Mã số</th> <th>Tên</th> <th>Giá</th> <th>Hãng</th> <th>Mô tả</th> <th>Tình trạng</th> <th></th> </tr> <tr th:each="p:${products}" th:object="${p}"> <td th:text="*{productId}"></td> <td th:text="*{productName}"></td> <td th:text="*{price}"></td> <td th:text="*{brand}"></td> <td th:text="*{description}"></td> <td th:text="*{active?'Còn hàng':'Hết hàng'}"></td> <td><a th:href="@{/san-pham/xoa/{id}(id=*{productId})}" onclick="return confirm('Bán có muốn xóa không?')" class="btn btn-danger">Xóa</a> <a th:href="@{/san-pham/sua/{id}(id=*{productId})}" class="btn btn-info">Sửa</a> <a th:href="@{/san-pham/chi-tiet/{id}(id=*{productId})}" class="btn btn-success">Chi tiết</a></td> </tr> </table> <div th:if="${totalPages > 0}"> <div class="row col-sm-10"> Tổng số [[${totalPages}]] trang: <span th:if="${currentPage == 1}"><<</span> <a th:unless="${currentPage == 1}" th:href="@{'/san-pham?page=1'}"><<</a> <a th:if="${currentPage > 1}" th:href="@{'/san-pham?page='+${currentPage-1}}"><</a> <span th:unless="${currentPage > 1}"><</span> <span th:each="i: ${#numbers.sequence(1, totalPages)}"> <a th:if="${currentPage != i}" th:href="@{'/san-pham?page=' + ${i}}">[[${i}]]</a> <span th:unless="${currentPage != i}">[[${i}]]</span> </span> <a th:if="${currentPage < totalPages}" th:href="@{'/san-pham?page=' + ${currentPage + 1}}">></a> <span th:unless="${currentPage < totalPages}">></span> <a th:if="${currentPage < totalPages}" th:href="@{'/san-pham?page=' + ${totalPages}}">>></a> <span th:unless="${currentPage < totalPages}">>></span> </div> </div> </div> </body> </html>
Bước 5: Chạy và xem kết quả
Source code tải tại đây
3. Video Demo
thay lời cảm ơn!
Các bài cũ hơn
- Truy xuất database sử dụng Spring Data JPA Phần 1 (02:14 PM - 20/03/2025)
- Validation Form-Upload File Image-Nhúng CKEditor trong SpringBoot (10:28 AM - 19/03/2025)
- Tìm hiểu về Form trong Thymeleaf (10:30 PM - 18/03/2025)
- Giới thiệu và cài đặt Thymeleaf trong Eclipse (09:58 PM - 16/03/2025)
- Tìm hiểu về Spring Boot MVC (10:01 AM - 15/03/2025)

