Đa ngôn ngữ sử dụng Internationalization(i18N) và Localization(L10N) trong Spring Web MVC
Đăng lúc: 03:04 PM - 14/11/2023 bởi Charles Chung - 2420Internationalization (i18N) và Localization(L10N) là hai thuật ngữ chỉ việc phát triển một phần mềm máy tính đa ngôn ngữ cũng, trong bài viết này tôi sẽ hướng dẫn các bạn tạo ứng dụng Spring Web MVC sử dụng i18N và L10N.

1. Giới thiệu
Ngày nay chúng ta muốn mở rộng thị trường để tăng doanh số thì việc phát triển phần mềm phải đáp ứng được cho nhiều quốc gia, khu vực khác nhau, bởi vì mỗi quốc gia, khu vực trên thế giới có ngôn ngữ, hệ thống đo lường, đơn vị tiền tệ, định dạng dữ liệu, v..v... khác nhau do vậy việc phát triển phần mềm cho nhiều quốc gia, khu vực khác nhau là điều cần thiết. Và việc này được triển khai thông qua hai khái niệm Internationalization (i18N) và Localization (L10N).
- Internationalization (i18N) là quá trình thiết kế một phần mềm để nó có thể được điều chỉnh thích hợp cho nhiều ngôn ngữ và khu vực mà không có sự thay đổi về kỹ thuật.
- Localization (L10N) là quá trình chỉ định một ngôn ngữ cụ cho phần mềm đã quốc tế hóa.
Quá trình Internationalization cần phải xử lý hai phần: dữ liệu trên giao diện và dữ liệu trong database. Trong bài viết này tôi sẽ hướng dẫn các bạn xử lý dữ liệu trên giao diện (ngôn ngữ, định dạng dữ liệu) trong Spring Web MVC.
2. Tạo ứng dụng Spring Web MVC sử dụng i18N và L10N
Bước 1: Tạo Dynamic Web Project
Khởi động Eclispe IDE -> vào menu File -> New -> Dynamic Web Project -> Nhập tên "SpringWebMVCi18N" (xem chi tiết bài này)
Bước 2: Convert sang Maven Project
- Kích chuột phải vào Project vừa tạo -> Configure -> Convert to Maven Project -> Finish
Bước 3: Khai báo các Maven Dependencies cần thiết
- Mở file pom.xml và cấu hình các Maven Dependencies gồm: spring web, web mvc, servlet api, jsp api, jstl
<dependencies>
<!-- https://mvnrepository.com/artifact/javax.servlet/jstl -->
<dependency>
<groupId>javax.servlet</groupId>
<artifactId>jstl</artifactId>
<version>1.2</version>
</dependency>
<dependency>
<groupId>javax.servlet</groupId>
<artifactId>servlet-api</artifactId>
<version>2.5</version>
<scope>provided</scope>
</dependency>
<!--https://mvnrepository.com/artifact/org.springframework/spring-webmvc -->
<dependency>
<groupId>org.springframework</groupId>
<artifactId>spring-webmvc</artifactId>
<version>5.3.18</version>
</dependency>
<!-- https://mvnrepository.com/artifact/org.springframework/spring-web -->
<dependency>
<groupId>org.springframework</groupId>
<artifactId>spring-web</artifactId>
<version>5.3.18</version>
</dependency>
</dependencies>
Bước 4: Cấu hình ứng dụng Spring Web Mvc
- Trong thư mục WEB-INF tạo thư mục views và tệp tin spring-servlet.xml
<?xml version="1.0" encoding="UTF-8"?>
<beans xmlns="http://www.springframework.org/schema/beans"
xmlns:xsi="http://www.w3.org/2001/XMLSchema-instance"
xmlns:p="http://www.springframework.org/schema/p"
xmlns:context="http://www.springframework.org/schema/context"
xmlns:mvc="http://www.springframework.org/schema/mvc"
xsi:schemaLocation="http://www.springframework.org/schema/beans http://www.springframework.org/schema/beans/spring-beans-4.0.xsd
http://www.springframework.org/schema/context http://www.springframework.org/schema/context/spring-context-4.0.xsd
http://www.springframework.org/schema/mvc http://www.springframework.org/schema/mvc/spring-mvc-4.0.xsd">
<!-- chỉ ra các package chứa các lớp java được đăng ký như là các bean -->
<context:component-scan base-package="controllers" />
<!-- chỉ tìm kiếm các bean trong cùng context application mà nó được định
nghĩa -->
<context:annotation-config />
<!-- mặc định các basic components được ủy quyền gửi request tới các controller -->
<mvc:annotation-driven />
<!-- cấu hình bean xác định view sẽ được sinh ra (thư mục chứa các view, đuôi tệp tin view) -->
<bean id="viewResolver" class="org.springframework.web.servlet.view.InternalResourceViewResolver" p:prefix="/WEB-INF/views/" p:suffix=".jsp" />
<!-- tạo bean tham chiếu đến tệp tin định nghĩa các message ngôn ngữ -->
<bean id="messageSource" class="org.springframework.context.support.ResourceBundleMessageSource">
<property name="basename" value="Language" />
</bean>
<!-- tạo bean local default là tiếng anh -->
<bean id="localeResolver" class="org.springframework.web.servlet.i18n.SessionLocaleResolver">
<property name="defaultLocale" value="en_US" />
</bean>
<!-- tạo bean interceptor để xác định sự thay đổi ngôn ngữ -->
<mvc:interceptors>
<bean id="localeChangeInterceptor" class="org.springframework.web.servlet.i18n.LocaleChangeInterceptor">
<property name="paramName" value="lang" />
</bean>
</mvc:interceptors>
</beans>
- Mở tệp web.xml và cấu hình vào bên trong thẻ <web-app> như sau:
<!-- add filter xử lý utf8 khi request và response -->
<filter>
<filter-name>encodingFilter</filter-name>
<filter-class>org.springframework.web.filter.CharacterEncodingFilter</filter-class>
<init-param>
<param-name>encoding</param-name>
<param-value>UTF-8</param-value>
</init-param>
<init-param>
<param-name>forceEncoding</param-name>
<param-value>true</param-value>
</init-param>
</filter>
<filter-mapping>
<filter-name>encodingFilter</filter-name>
<url-pattern>/*</url-pattern>
</filter-mapping>
<!-- Add Spring MVC DispatcherServlet as front controller -->
<servlet>
<servlet-name>spring</servlet-name>
<servlet-class>org.springframework.web.servlet.DispatcherServlet</servlet-class>
<init-param>
<param-name>contextConfigLocation</param-name>
<param-value>/WEB-INF/spring-servlet.xml</param-value>
</init-param>
<load-on-startup>1</load-on-startup>
</servlet>
<servlet-mapping>
<servlet-name>spring</servlet-name>
<url-pattern>/</url-pattern>
</servlet-mapping>
Bước 5: Tạo controllers, views và các tệp ngôn ngữ
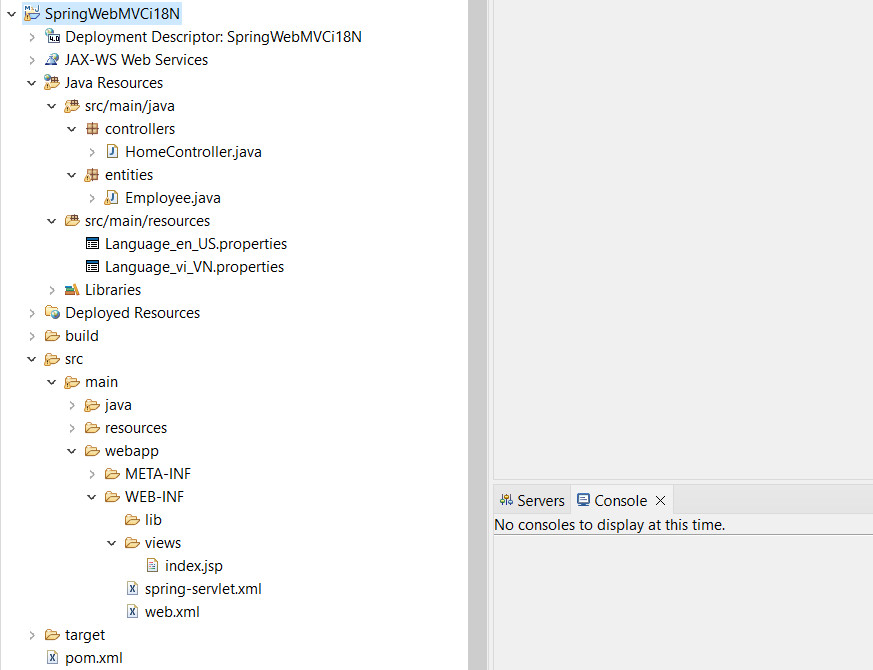
- Tạo tệp tin Language_en_US.properties trong src/main/resources
title=Employee Details
vi=Vietnamese
en=English
id=Employee Id
fullname=Full Name
birthday=Birthday
salary=Basic Salary
rate=Rate Salary
total=Total Salary
- Tạo tệp tin Language_vi_VN.properties trong src/main/resources
title=TH\u00D4NG TIN NH\u00C2N VI\u00CAN
vi=Ti\u1EBFng Vi\u1EC7t
en=Ti\u1EBFng Anh
id=M\u00E3 s\u1ED1
fullname=H\u1ECD v\u00E0 t\u00EAn
birthday=Ng\u00E0y sinh
salary=L\u01B0\u01A1ng c\u01A1 b\u1EA3n
rate=H\u1EC7 s\u1ED1 l\u01B0\u01A1ng
total=Th\u1EF1c l\u0129nh
- Tạo tệp tin index.jsp trong views
<%@ page language="java" contentType="text/html; charset=UTF-8"
pageEncoding="UTF-8"%>
<%@ taglib prefix="spring" uri="http://www.springframework.org/tags" %>
<%@ taglib prefix="fmt" uri="http://java.sun.com/jsp/jstl/fmt" %>
<!DOCTYPE html>
<html>
<head>
<meta charset="UTF-8">
<title><spring:message code="title"/></title>
</head>
<body>
<p>
<a href="?lang=vi_VN"><spring:message code="vi"/></a> -
<a href="?lang=en_US"><spring:message code="en"/></a>
</p>
<hr/>
<h1><spring:message code="title"/></h1>
<p><spring:message code="id"/>: ${emp.employeeId}</p>
<p><spring:message code="fullname"/>: ${emp.fullName}</p>
<p><spring:message code="birthday"/>:<fmt:formatDate value="${emp.birthDay}"/></p>
<p><spring:message code="salary"/>:<fmt:formatNumber value="${emp.salary}" type="currency" /></p>
<p><spring:message code="rate"/>: <fmt:formatNumber value="${emp.rate}" type="number" /></p>
<p><spring:message code="total"/>:<fmt:formatNumber value=" ${emp.salary*emp.rate}" type="currency" /></p>
</body>
</html>
- Tạo tệp tin Employee.java trong entities
package entities;
import java.io.Serializable;
import java.util.Date;
public class Employee implements Serializable {
private String employeeId;
private String fullName;
private Date birthDay;
private double salary;
private double rate;
public Employee() {
// TODO Auto-generated constructor stub
}
public Employee(String employeeId, String fullName, Date birthDay, double salary, double rate) {
super();
this.employeeId = employeeId;
this.fullName = fullName;
this.birthDay = birthDay;
this.salary = salary;
this.rate = rate;
}
public String getEmployeeId() {
return employeeId;
}
public void setEmployeeId(String employeeId) {
this.employeeId = employeeId;
}
public String getFullName() {
return fullName;
}
public void setFullName(String fullName) {
this.fullName = fullName;
}
public Date getBirthDay() {
return birthDay;
}
public void setBirthDay(Date birthDay) {
this.birthDay = birthDay;
}
public double getSalary() {
return salary;
}
public void setSalary(double salary) {
this.salary = salary;
}
public double getRate() {
return rate;
}
public void setRate(double rate) {
this.rate = rate;
}
}
- Tạo tệp tin HomeController.java trong controllers
package controllers;
import java.text.ParseException;
import java.text.SimpleDateFormat;
import org.springframework.stereotype.Controller;
import org.springframework.ui.Model;
import org.springframework.web.bind.annotation.RequestMapping;
import entities.Employee;
@Controller
public class HomeController {
@RequestMapping("/")
public String index(Model model) {
Employee emp=null;
try {
emp = new Employee("E001","Nguyễn Mạnh Hùng",new SimpleDateFormat("yyyy-MM-dd").parse("2000-07-12"),2500,3.5);
} catch (ParseException e) {
// TODO Auto-generated catch block
e.printStackTrace();
}
model.addAttribute("emp",emp);
return "index";
}
}
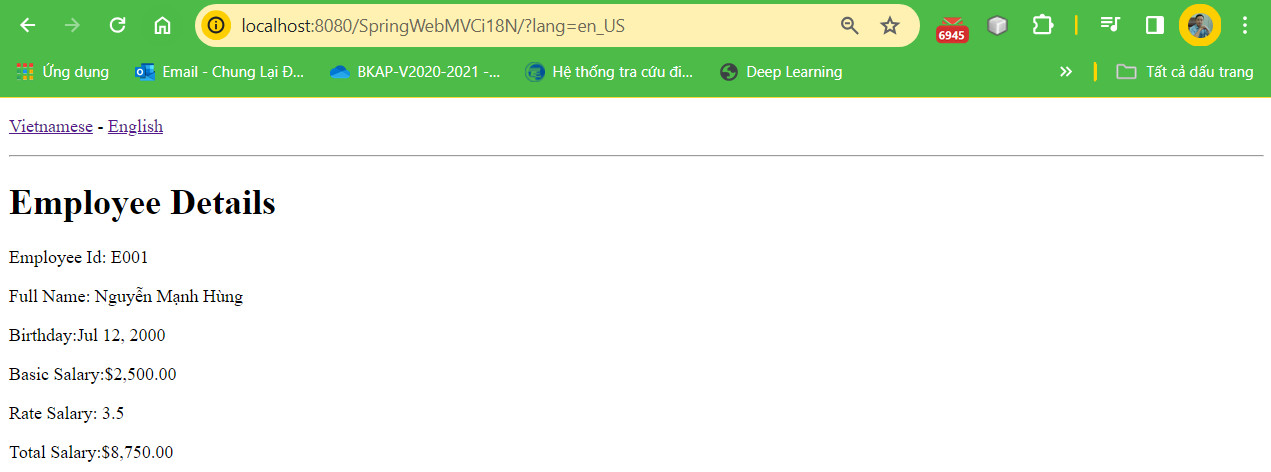
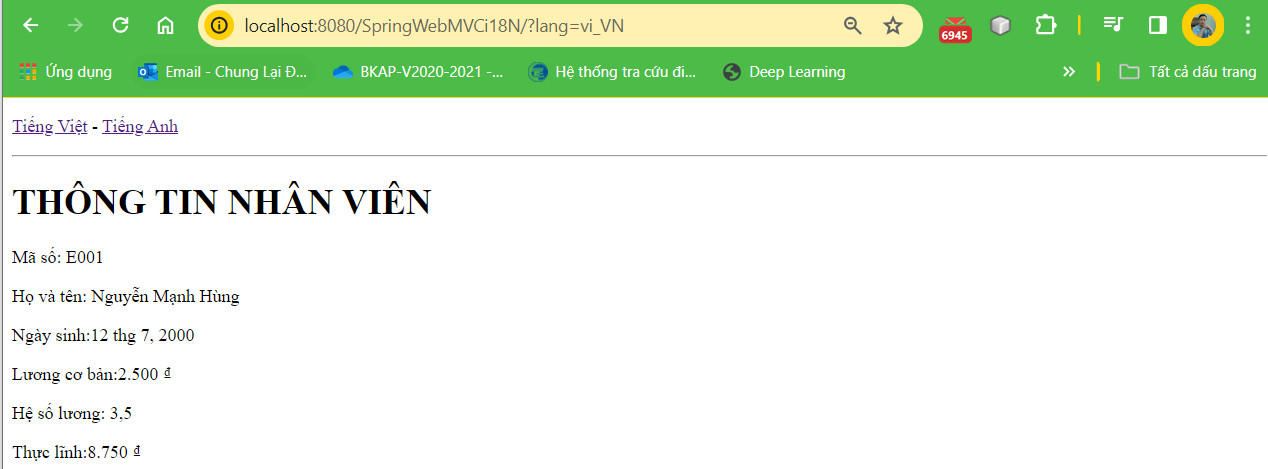
Bước 6: Run application
- Kích chuột phải vào project chọn Run As -> Run on Server -> Tomcat v9.0
Màn hình hiển thị Tiếng Anh
Màn hình hiển thị Tiếng Việt
Kích để tải source code bài Đa ngôn ngữ sử dụng Internationalization(i18N) và Localization(L10N) trong Spring Web MVC
Training online liên hệ: Charles Chung
Video
thay lời cảm ơn!
Các bài cũ hơn
- Security trong Spring Web MVC với Hibernate và Oracle Database (08:44 AM - 11/11/2023)
- Authentication và Authorization trong việc bảo mật ứng dụng Web (08:48 AM - 10/11/2023)
- 10 lý do nên chọn Spring Boot để phát triển các ứng dụng Web (09:45 AM - 08/11/2023)
- Hướng dẫn sử dụng CKEditor và Upload file trong Spring MVC (08:58 PM - 07/11/2023)
- Tạo bố cục-Layout trong Spring Web MVC sử dụng Apache Tile 3 (07:08 PM - 01/11/2023)


